Connecting Nodes with the Connect Wizard
A guided two-step flow for wiring any two Krill nodes together — run after, observe, or read as an input — without touching a settings tab.
The hardest part of Krill, made into two taps
Krill has no central controller. Every node — a sensor reading, a trigger, an email sender, a GPIO pin — does one job, and behavior emerges from how you wire them together. That wiring is the single most powerful idea in the platform, and it’s also the one new users trip over the most. Until now you wired nodes on the Sources tab of each node’s editor, which works great once you already understand the model — and teaches you nothing if you don’t.
The new Connect Nodes wizard fixes that. Open any node’s editor and there’s a 🔗 Connect Nodes button right on the Overview tab, under the node’s chip. Tap it, pick a second node, pick how they should be related, done. Two screens, no jargon, and it works for every node type — including nodes that live on a different Krill server in your mesh.
Not every combination of node types makes sense — but there are no limits on how you wire your swarm. The wizard doesn’t second-guess you with a compatibility matrix; it just makes the wiring you asked for, correctly.
Step 1 — pick the node to connect
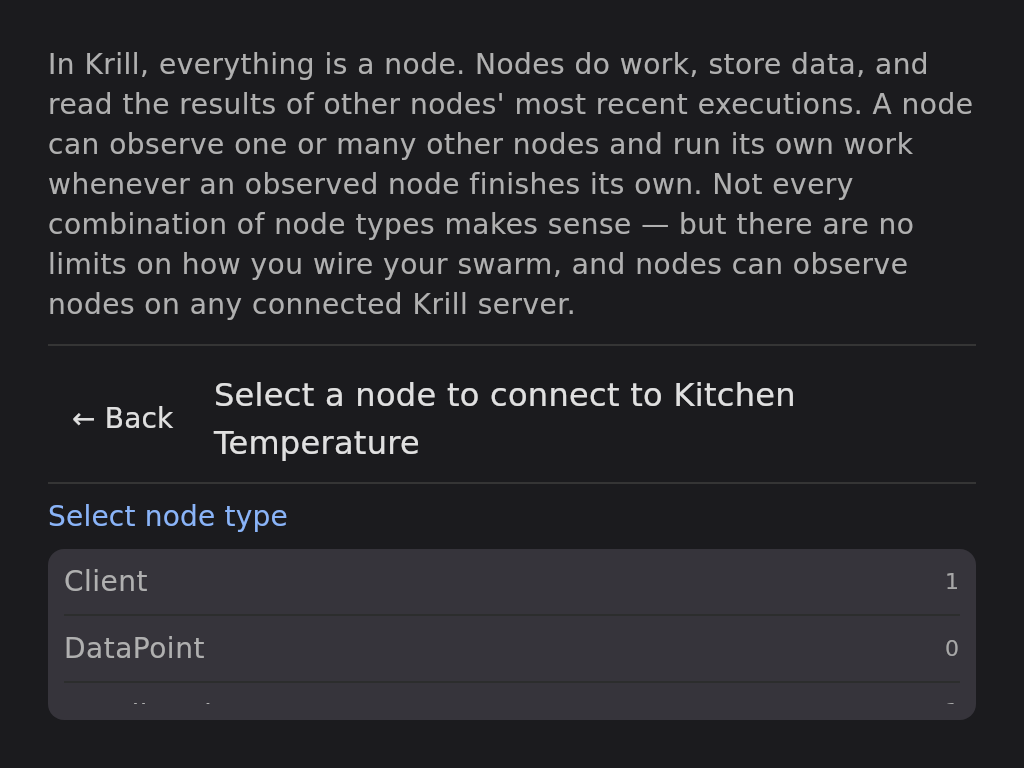
The first screen opens with the one paragraph I most want every Krill user to internalize: everything is a node, nodes do work and store results, and a node can observe other nodes and run its own work whenever something it’s watching finishes. That’s the whole model — the wizard states it up front and then hands you the same node picker used everywhere else in the app, grouped by server, with the node you started from filtered out.
Pick the node you want to connect to. It can be a Data Point, a Trigger, an Executor, a Pin on a Raspberry Pi — anything in the swarm, on any connected server.
Step 2 — pick the relationship
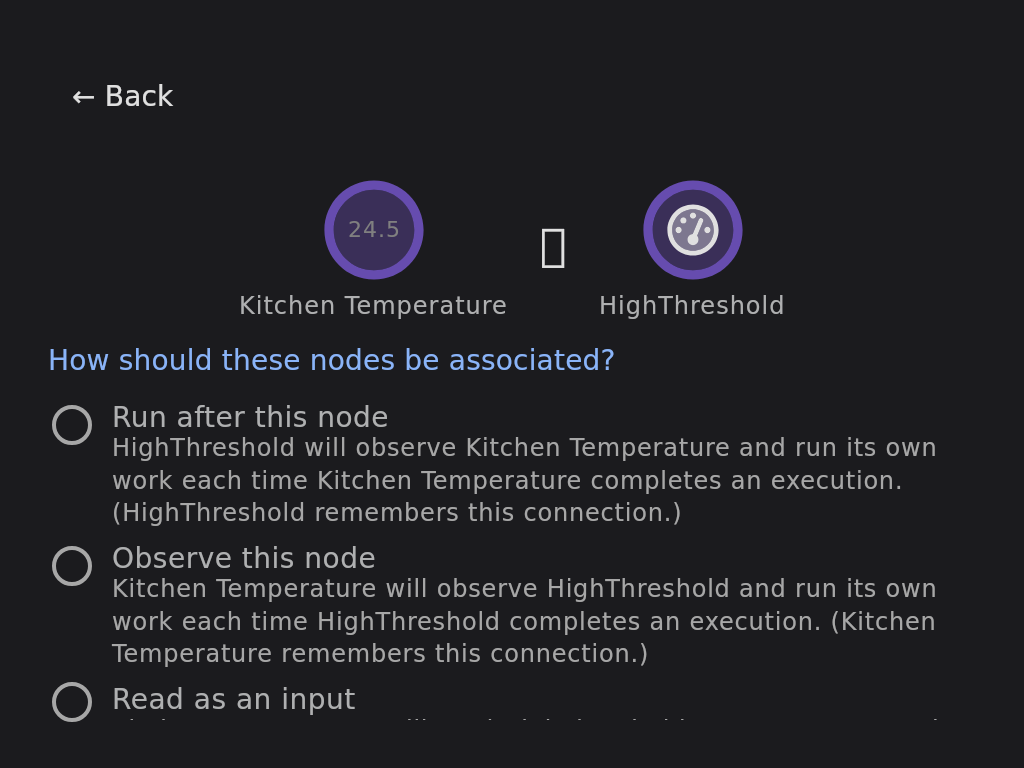
Both node icons sit at the top, and below them one question: how should these nodes be associated? There are exactly three answers in Krill, and the wizard spells out each one with your actual node names substituted in, so the option reads like a sentence about your swarm instead of an abstraction:
- Run after this node — the node you picked will observe the node you started from, and run its own work each time it completes an execution.
- Observe this node — the reverse: the node you started from will observe the one you picked.
- Read as an input — the node you started from will read the picked node’s most recent result while doing its own work. Reading an input never triggers anything — it’s a lookup, not a wake-up.
Pick one, hit 🔗 Connect, and you land back on the swarm view with the wiring saved.
The idea the wizard is teaching
Options 1 and 2 do the same thing in opposite directions, and that’s deliberate — the asymmetry is the lesson. In Krill, a connection is always stored on the node that observes. Nothing is ever pushed downstream; the observer remembers who it watches, wakes when a source fires, and pulls what it needs. So “Run after this node” actually edits the other node’s wiring — it’s the other node that will be doing the observing — and the wizard’s copy tells you exactly which node “remembers” the connection. Once that clicks, the Sources tab on every editor stops being mysterious.
Connecting two nodes that are already connected is a quiet no-op — the wizard saves and exits and your wiring is unchanged. There’s nothing to undo and no duplicate to clean up.
Three small examples
The fastest way to see the three options is one tiny monitoring chain:
- A trigger observes a sensor. Open a temperature Data Point, connect to a High Threshold Trigger, choose Run after this node. Now every new reading invokes the trigger, which compares the value against its threshold.
- An alert runs after the trigger. Open the trigger, connect to an email Executor, choose Run after this node. When the threshold trips, the email fires. Same option, next link in the chain.
- A calculation reads a second sensor as an input. Open a Calculation node, connect to a humidity Data Point, choose Read as an input. The calculation can now use the humidity value whenever it runs — but a new humidity reading doesn’t run the calculation. Inputs are for data a node consults, not events it reacts to.
That third one is the distinction that used to take people the longest to find on their own: sources wake you up, inputs are what you read once you’re awake. The wizard puts both on the same screen with one line of plain language each.
Power users lose nothing
The wizard is the front door, not a replacement. Every connection it writes is ordinary node wiring — it shows up on the Sources tab like always, and the per-type editors remain the place for bulk rewiring or removing connections. And because the wizard rides the same save path as everything else, picking a node on a peer server just works: the connection is written to whichever server owns the node that remembers it.
Related
- How Nodes, Verbs, and Sources Work — the observe/invoke model the wizard teaches
- Data Points — the nodes that store your time-series readings
- Triggers and the High Threshold Trigger — watching a value and firing on a condition
- Executors — the action nodes you’ll wire downstream
- Krill Peer Mesh Network — connecting nodes across servers
Last verified: 2026-06-10